Day 2 - Developing a custom xApp in Python
This document describes how to write an xApp in Python, how to deploy it on the RIC platform, and how to use the xApp to communicate with the RAN.
Background
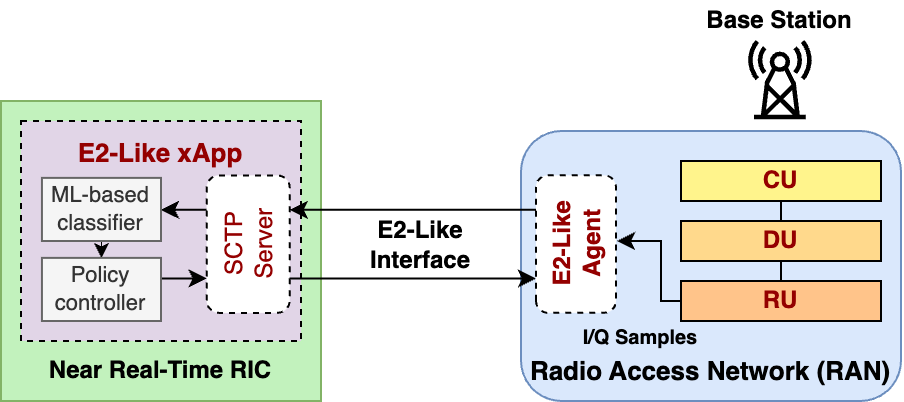
An xApp is simply an application that is deployed to the near-real-time RAN Intelligent Controller (RIC) and is capable of communicating to the RAN. (Note that there is also a non-real-time RIC; applications stored in the non-real-time RIC are called rApps instead.) An xApp can be developed in any programming language, but to be O-RAN compliant, it needs to be able to communicate over the E2 interface to E2 nodes. An E2 Node refers to a component of the RAN that can interface with the RIC via E2, usually referring to the base station (DU/CU).
For this demonstration, we will simplify the xApp development process such that we utilize an E2-like interface, enabling us to focus on the functionality of our application rather than the specifications of the protocol (encoding and decoding of ASN.1 messages, subscription processes, etc.)
To understand how an xApp works, first we must look at how an O-RAN network is implemented. The RAN Intelligent Controller (RIC) is capable of dynamically controlling the RAN. The RIC consists of a Kubernetes cluster which hosts several deployments which contain services and pods. An application such as an xApp is executed in the RIC using a deployment, which consists of the instructions and components needed to run the application.

Inside the deployment, there are pods which contain different microservices, which are small containers running different software and make up the application. These containers are created and deployed using Docker, using an image that we prepare beforehand that consists of everything needed for the application to start instantly. For this xApp, we will use a single Kubernetes deployment with a single pod, running a single Docker container.
For more information on Kubernetes and Docker, see the Background on Docker, Kubernetes & Helm section.
Deployment Workflow
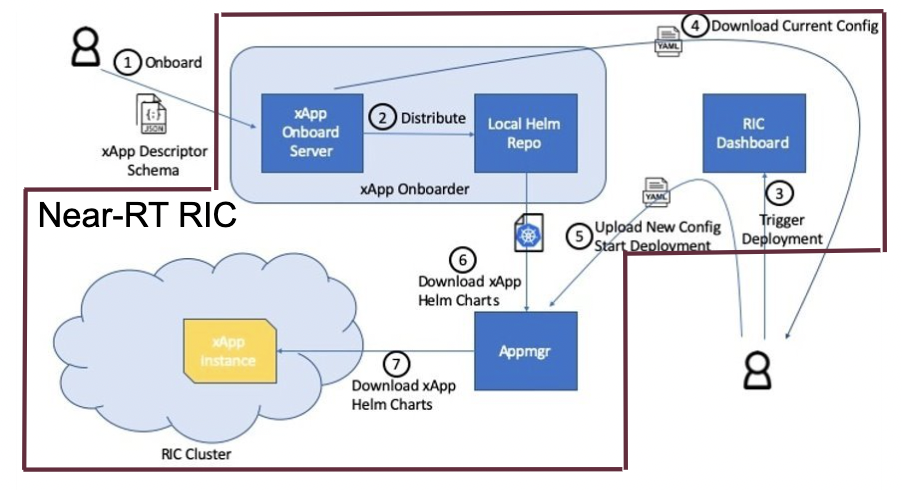
source: On-boarding and Deploying xApps, Zhe Huang
This diagram depicts an overview of the xApp deployment workflow. The important parts are:
- ① xApp config file
The configuration file is a JSON file
It contains Docker image name, network ports, and supported E2 messages
This config file is submitted to the RIC through the xApp Onboarder
- ①,② xApp Onboarder
The xApp Onboarder is a service in the near-RT RIC which accepts config files and generates charts
The xApp charts contain instructions on how to deploy an xApp
- ⑤,⑥ App Manager
The App Manager is another service in the RIC which deploys xApps based on charts stored in the onboarder
- ⑦ RIC cluster
xApps are deployed as pods in Kubernetes
Setup
Compiling E2-like srsRAN
For our purposes, we use a modified version of srsRAN which accepts our E2-like commands. Follow the steps to compile the E2-like srsRAN:
cd srsRAN-e2
mkdir build
export SRS=`realpath .`
cd build
cmake ../ -DCMAKE_BUILD_TYPE=RelWithDebInfo \
    -DENABLE_E2_LIKE=1 \
    -DENABLE_AGENT_CMD=1 \
    -DRIC_GENERATED_E2AP_BINDING_DIR=${SRS}/e2_bindings/E2AP-v01.01 \
    -DRIC_GENERATED_E2SM_KPM_BINDING_DIR=${SRS}/e2_bindings/E2SM-KPM \
    -DRIC_GENERATED_E2SM_GNB_NRT_BINDING_DIR=${SRS}/e2_bindings/E2SM-GNB-NRT
make -j`nproc`
sudo make install
sudo srsran_install_configs.sh user --force
cd ../../
Once it is done, make sure the eNB and UE configs have ZeroMQ enabled (device_name and device_args for ZMQ are uncommented):
sudo nano /root/.config/srsran/enb.conf
sudo nano /root/.config/srsran/ue.conf
[rf]

...

#device_args = auto
#time_adv_nsamples = auto

# Example for ZMQ-based operation with TCP transport for I/Q samples
device_name = zmq
device_args = fail_on_disconnect=true,tx_port=tcp://*:2000,rx_port=tcp://localhost:2001,id=enb,base_srate=23.04e6
Creating RAM filesystem
The current implementation of the E2-like interface in srsRAN uses files to communicate between threads. This can cause a slowdown in performance as reading a file from a hard drive is relatively slow, and it also takes time to call the OS to request this data. Despite this, we can improve the speed by writing the files to a temporarily filesystem stored in RAM instead of a hard drive.
sudo mkdir /mnt/tmp
sudo mount -t tmpfs none -o size=64M /mnt/tmp
touch /mnt/tmp/agent_cmd.bin /mnt/tmp/iq_data_last_full.bin /mnt/tmp/iq_data_tmp.bin
sudo chmod -R 755 /mnt/tmp
The above commands will create a 64MB filesystem in RAM at /mnt/tmp and create a few empty files.
agent_cmd.binstores the most recent E2-like command receivediq_data_tmp.binstores a buffer of I/Q data that is currently being written to by srsRANiq_data_last_full.binstores the last completely full buffer of I/Q data
Once we have this filesystem set up, we can continue on to the xApp development.
Development
First, let’s take a look at the ric-app-ml-e2like directory, where the xApp is located. We use a Python file called app.py to store the main code of our xApp. In this file we will setup an SCTP connection and run a constant loop to accept a connection from a nodeB (base station), receive data and send control messages to change the RAN’s behavior.
The E2-like version of srsRAN is configured to send uplink I/Q data, which we can use to generate spectrogram images and analyze information about the channel using the xApp.
When using the E2-like interface, the xApp acts as an SCTP server and the nodeB is a client.
Here are some excerpts of the code:
def init_e2(self):
    global server

    # This will automatically find a correct IP address to use, which can change depending on where the xApp is deployed.
    ip_addr = socket.gethostbyname(socket.gethostname())
    port = 5000

    # Start the SCTP server and bind to the address and port
    server = sctp.sctpsocket_tcp(socket.AF_INET)
    server.bind((ip_addr, port))
    server.listen()

def entry(self):
    global current_iq_data, last_cmd, server

    # Initialize the E2-like interface
    init_e2(self)

    # E2-like interface main loop
    while True:
        try:
            # Accept SCTP connections
            conn, addr = server.accept()

            log_info(self, f'Connected by {addr}')

            initial = time.time()  # initial timestamp

            # Loop which runs if an SCTP connection is established
            while True:
                # Send an E2-like request to ask nodeB to send I/Q data
                conn.send(f"E2-like request at {datetime.now().strftime('%H:%M:%S')}".encode('utf-8'))
                log_info(self, "Sent E2-like request")

                # Sending too much SCTP data in a single message will freeze the connection up, so we have srsRAN split our data
                # into chunks of 16384 bytes. The data in this case is I/Q data sourced from the RU (radio unit).
                # This section of code will receive enough I/Q data to make one 10ms spectrogram.
                data = conn.recv(16384)
                if data:
                    log_info(self, f"Receiving I/Q data...")
                    while len(data) < spectrogram_size:
                        data += conn.recv(16384)

                    log_info(self, f"Received buffer size {len(data)}")
                    log_info(self, f"Finished receiving message, processing")

                    # Point our global variable to the I/Q data we just received, and use our machine learning model
                    # to make a prediction.
                    current_iq_data = data
                    result = run_prediction(self)

                    # If there is interference, send a command to turn on adaptive MCS.
                    # This is a feature in srsRAN that we can leverage. When we turn it off, we set the MCS to a fixed value.
                    if result == 'Interference':
                        log_info(self, "Interference signal detected, sending control message to enable adaptive MCS")
                        #conn.send(cmds['BASE_STATION_OFF'])
                        conn.send(cmds['ENABLE_ADAPTIVE_MCS'])
                    elif result in ('5G', 'LTE'): #and last_cmd == cmds['BASE_STATION_OFF']:
                        log_info(self, "Interference signal no longer detected, sending control message to disable adaptive MCS")
                        #conn.send(cmds['BASE_STATION_ON'])
                        conn.send(cmds['DISABLE_ADAPTIVE_MCS'])

        # Log any errors with the SCTP connection, but continue to run
        except OSError as e:
            log_error(self, e)

def run_prediction(self):
    global current_iq_data

    # convert I/Q data into a spectrogram that our machine learning model can use as input
    sample = iq_to_spectrogram(current_iq_data)
    # Make a prediction with our spectrogram and get the result
    result = predict(self, sample)

    return result

def predict(self, data) -> str:
    # Actually do the prediction. This will be dependent on your model.
    prediction, confidence = model_predict(ai_model, data)

    classifiers = ['5G', 'LTE', 'Interference']

    return classifiers[prediction] if confidence > CONFIDENCE_THRESHOLD else None

def model_predict(model, unseen_data):
    # Instead of implementing a real model, we will simply use random values

    # Every 8 seconds, alternate between detecting LTE/5G and detecting interference.
    prediction = random.randint(0,1) if (time.time() - start_time) % 16.0 < 8.0 else 2
    confidence = random.random()

    return prediction, confidence
This xApp assumes a hypothetical scenario where interference is detected over the network using a machine learning model. In our case, we do not use a real model, but one could easily be substituted into this sample code. When interference is detected, we send a command from the xApp to the RAN to control the base station. In this case, we manipulate the Modulation and Coding Scheme (MCS) to mitigate interference. When interference is detected, we turn on adaptive MCS, and when it is no longer detected we disable it by setting the MCS to a fixed value. We only affect the uplink MCS for the purposes of this demo. We can adjust different parameters besides MCS if we implement the capabilitiy to do so on our RAN.
Here is an example image of a spectrogram generated from the uplink I/Q data received by the base station. In this image, 10ms of I/Q data is shown from a single UE.

Integrating machine learning into xApps
Although this example xApp does not directly use a model, it’s a good idea to demonstrate how a real ML model would be integrated into an xApp.
To begin, we can look into basic neural networks. For our purposes, we can view a neural network as a black box that takes an input vector and gives us an output vector as a result. Our goals are to convert our inputs to the format that the model wants, and to be able to interpret the output results.
Let’s assume we have a deep neural network (DNN) that is meant to classify the state of the network based on KPMs (key performance metrics) such as bitrate and error rate. If we assume those are the only two KPMs, then there are two values per point in time. Generally, it’s a good idea to evaluate multiple time points in a model, so we’ll say that there are 10 time points in the input, leading to a 2x10 input matrix.
The model might look something like this:
model = tf.keras.Sequential([
    tf.keras.layers.Input(shape=(20,)),  # 2x10 KPMs
    ...
    tf.keras.layers.Dense(2, activation='softmax')   # two outputs
])
To have enough KPM data, we need to save each time point and add it to an array of time points.
# Keep an array of time points
# This is an array of 10 KPM data points, filled with zeroes.
time_points = [b'\x00'*8 for i in range(10)]

while True:
    # Bitrate and error rate are floats, which are 4 bytes each, making 8 bytes total
    data_point = conn.recv(8)
    arr.append(data_point)

    # Once we have enough data
    if len(time_points) >= 10:
        # handle 10 KPM data points we collected
        process_kpms(time_points[:10])
        # reset the array
        time_points = []
Meanwhile in srsRAN, we can decide what data to send over the E2-like interface by changing the behavior of the E2 agent in src/ric/agent.cc. If we want to collect the bitrate and the error rate from srsRAN’s metrics, we could include something like this in agent::handle_message:
float ul_rate_sum = 0.0, ul_bler_sum = 0.0;

srsenb::enb_metrics_t enb_metrics = {};
if (enb_metrics_interface->get_metrics(&enb_metrics)) {
    // for each UE
  for (size_t i = 0; i < enb_metrics.stack.rrc.ues.size(); i++) {

    if (enb_metrics.stack.mac.ues[i].nof_tti)  // if there are UEs actually connected
      ul_rate_sum += enb_metrics.stack.mac.ues[i].rx_brate / (enb_metrics.stack.mac.ues[i].nof_tti * 1e-3);
    if (enb_metrics.stack.mac.ues[i].rx_pkts)  // if we've received any data from the UEs
      ul_bler_sum += (float)(100*enb_metrics.stack.mac.ues[i].rx_errors)/enb_metrics.stack.mac.ues[i].rx_pkts;

  }
}

// send the values over E2-like interface as bytes
send_sctp_data(static_cast<uint8_t*>(static_cast<void*>(&ul_rate_sum)), 4);  // bitrate
send_sctp_data(static_cast<uint8_t*>(static_cast<void*>(&ul_bler_sum)), 4);  // block error rate
For a deep neural network functioning as a classifier, our output will be a vector representing the model’s confidence of each possible class. We will assume two classes: signal without interference, and signal with interference.
def handle_kpms(kpms):
    global model
    # We want a one-dimensional array of floats corresponding to the KPMs of 10 data points (20 floats total)
    # For each data point, convert every 4 bytes to a float
    kpm_floats = np.array(
        [np.frombuffer(data_point, dtype=float) for data_point in kpms]
    )
    # Flatten to one-dimensional array by concatenating all of the floats together
    sample = kpm_floats.flatten()

    predict(model, sample)

classes = {
    0: 'signal without interference',
    1: 'signal with interference'
}

def predict(model, sample):
    # Using Keras, it's as simple as model.predict(sample)
    # For PyTorch it's model(sample)
    output = model.predict(sample)

    # The output is structured like [0.2, 0.5]
    # where 0.2 is the confidence value for signal without interference,
    # and 0.5 is the confidence value for signal with interference.

    # We want to find the class with the maximum confidence.
    # We can use np.argmax() for this, which will give us the
    # index where the maximum confidence value is located and the value itself.
    max_index, max_confidence = np.argmax(output, axis=1)  # [1, 0.5]

    # To get the value, we do np.argmax(output)
    prediction = classes[max_index]

    return prediction, max_confidence
Using these functions, we can convert the KPM inputs that we’re receiving from the RAN side and feed them into our ML model. From here, we can decide how to act. We could set a minimum confidence value that is needed for the model to take action, or accept the highest prediction every time. Once we have a prediction, we can use it to dynamically control the RAN, as we’ve seen in the example xApp code.
For examples of ML xApps, refer to the interference classification xApp for a similar approach, as well as the spectrum sensing xApp for object detection.
Deployment
1. Building the Docker image
Our xApp will be hosted in a Docker container. In order to create a Docker container, we must provide a Dockerfile which will provide the instructions as to how the machine should be set up. In this case, we use an Ubuntu setup with Python as the base for our Docker image. This is what the Dockerfile looks like:
# Load a miniconda setup for our base Docker image which contains Python
FROM continuumio/miniconda3

# Install all necessary libraries
RUN apt-get update && apt-get -y install build-essential musl-dev libjpeg-dev zlib1g-dev libgl1-mesa-dev wget dpkg libsctp-dev

# Copy all the files in the current directory to /tmp/ml in our Docker image
COPY . /tmp/ml

# Go to /tmp/ml
WORKDIR /tmp/ml

# Install requirements.txt
RUN pip install --upgrade pip && pip install requirements.txt

# Set our xApp to run immediately when deployed
ENV PYTHONUNBUFFERED 1
CMD app.py
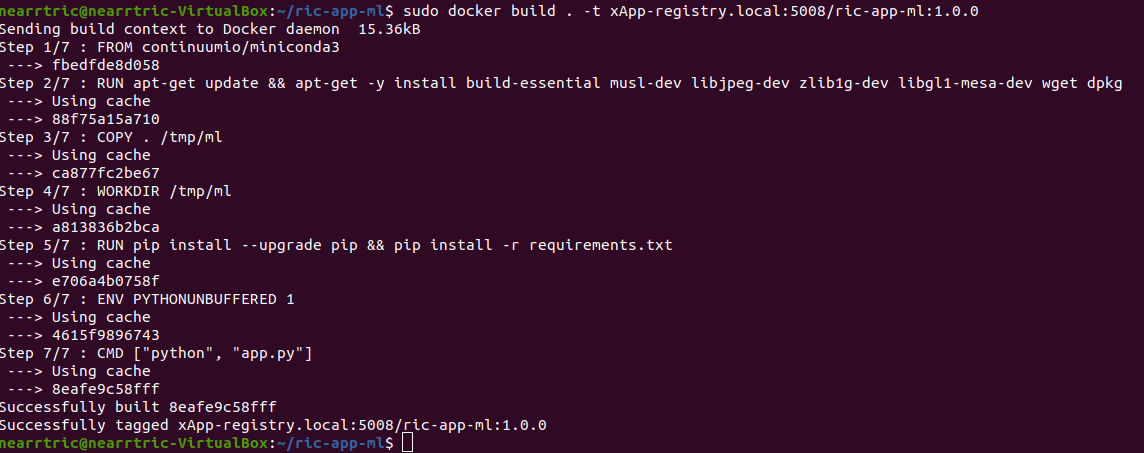
Once we have this Dockerfile, we can then build our Docker image and submit it to the xApp registry. This is done with one command:
sudo docker build . -t xApp-registry.local:5008/ric-app-ml:1.0.0
This builds a Docker image labeled ric-app-ml with version 1.0.0, and submits it to the xApp registry.
2. Creating the xApp config
In our xApp, we have an init folder which contains the config.json file.
{
    "json_url": "ric-app-ml",
    "xapp_name": "ric-app-ml",
    "version": "1.0.0",
    "containers": [
        {
            "name": "ric-app-ml",
            "image": {
                "registry": "xApp-registry.local:5008",
                "name": "ric-app-ml",
                "tag": "1.0.0"
            }
        }
    ],
    "messaging": {
        "ports": [
            {
                "name": "rmr-data",
                "container": "ric-app-ml",
                "port": 4560,
                "rxMessages": [ "RIC_SUB_RESP", "RIC_SUB_FAILURE", "RIC_INDICATION", "RIC_SUB_DEL_RESP", "RIC_SUB_DEL_FAILURE" ],
                "txMessages": [ "RIC_SUB_REQ", "RIC_SUB_DEL_REQ" ],
                "policies": [1],
                "description": "rmr receive data port for ric-app-ml"
            },
            {
                "name": "rmr-route",
                "container": "ric-app-ml",
                "port": 4561,
                "description": "rmr route port for ric-app-ml"
            }
        ]
    },
    "rmr": {
        "protPort": "tcp:4560",
        "maxSize": 2072,
        "numWorkers": 1,
        "txMessages": [ "RIC_SUB_REQ", "RIC_SUB_DEL_REQ" ],
        "rxMessages": [ "RIC_SUB_RESP", "RIC_SUB_FAILURE", "RIC_INDICATION", "RIC_SUB_DEL_RESP", "RIC_SUB_DEL_FAILURE" ],
    "policies": [1]
    }
}
This config file is important as it signifies where the Docker image is located, and also provides the ports and capabilities of the E2 interface. In our case, we are using an E2-like interface instead of the E2, so we will expose our own port after the deployment.
3. Finding local IP address
Before running further steps, we will need the local IP address of the system. Use the first command hostname -I to find your local IP addresses. The first one that appears should work. Then, run the second command and replace <ip address> with the first IP you see. On my system, the address is 10.0.2.15.
hostname -I
export HOST_IP=<ip address>
Once this is done, we can replace the machine IP address with $HOST_IP.
4. Configuring the Nginx Web server
The xApp descriptor files (config.json) must be hosted on a webserver when we use the xapp-onboarder to deploy xApps. This is because the xApp onboarder cannot access our local files, so we have to upload them to the network where it can find and download them. We will use Nginx as our webserver for hosting config files.
First, we need to install Nginx and check if it is in active (running) state.
sudo apt install nginx
sudo systemctl status nginx
Now we create some directories which can be accessed by the server and where the config files can be hosted.
sudo mkdir /var/www/xApp_config.local
sudo mkdir /var/www/xApp_config.local/config_files
Create a Custom Configuration File and define file locations
sudo nano /etc/nginx/conf.d/xApp_config.local.conf
Paste the following content in the conf file.
server {
    listen 5010 default_server;
    server_name xApp_config.local;
    location /config_files/ {

        root /var/www/xApp_config.local/;
    }

}
Save and update the configuration file with the following command, and check if there are any errors in the configuration file. If there is no output, then it updated successfully.
sudo nginx -t

5. Hosting the config Files
Make sure you are in the xApp directory, then copy the xApp config file to this directory. When we copy this file with sudo, it also protects the file from being modified, so we use the chmod command to re-enable read/write permissions.
sudo cp init/config.json /var/www/xApp_config.local/config_files/ml-config-file.json
sudo chmod 755 /var/www/xApp_config.local/config_files/ml-config-file.json
sudo systemctl restart nginx
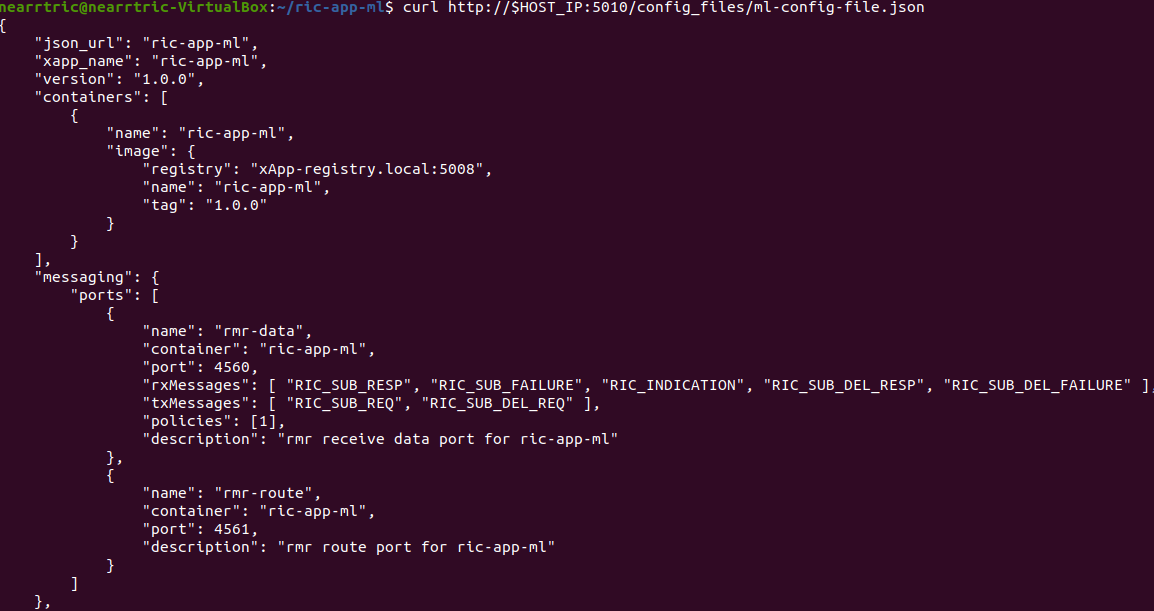
At the end of these commands we restart nginx to ensure that it is properly running. Now, you can check if the config file can be accessed from the newly created server.
curl http://$HOST_IP:5010/config_files/ml-config-file.json
6. Create onboard URL file
Next, we need to create a .url file to point the xApp-onboarder to the Nginx server to get the xApp descriptor file and use it to create a helm chart and deploy the xApp. We echo the IP address to remember what it is, as we have to type it in ourselves in the text file.
echo $HOST_IP
nano ml-onboard.url
Paste the following in the ml-onboard.url file. Substitute the <machine_ip_addr> with the IP address of your machine. You can find this out through hostname -I or echo $HOST_IP.
{"config-file.json_url":"http://<machine_ip_addr>:5010/config_files/ml-config-file.json"}

Save the file. Now we are ready to deploy the xApp.
7. Onboard and deploy the xApp
First, we collect and store the IP address of the Kong proxy to a variable, which allows us to connect to the different components of the RIC through a single address.
export KONG_PROXY=`sudo kubectl get svc -n ricplt -l app.kubernetes.io/name=kong -o jsonpath='{.items[0].spec.clusterIP}'`

Then, we submit our onboard URL file to the xApp onboarder, which indicates to the onboarder where our xApp config file is.
curl -L -X POST "http://$KONG_PROXY:32080/onboard/api/v1/onboard/download" --header 'Content-Type: application/json' --data-binary "@ml-onboard.url"

The config file is then processed by the xApp onboarder and a chart is created, which contains the instructions to deploy the xApp.
Finally, we request that the App Manager deploys our specific xApp, ric-app-ml. It will use the chart that the xApp onboarder has to deploy our xApp.
curl -L -X POST "http://$KONG_PROXY:32080/appmgr/ric/v1/xapps" --header 'Content-Type: application/json' --data-raw '{"xappName": "ric-app-ml"}'

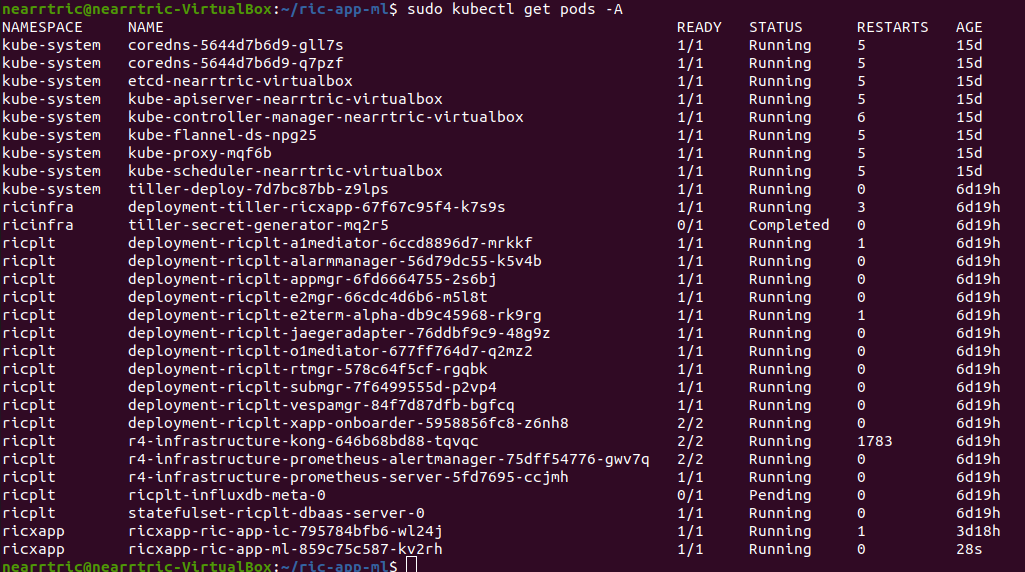
Verify if the xApp is deployed using sudo kubectl get pods -A. There should be a ric-app-ml pod visible in the “ricxapp” namespace.
Once the xApp is deployed, it will automatically restart itself on failure and will continue to run even on a restart of the computer, as long as the Kubernetes cluster is running. You will have to manually restart an xApp when making changes, and you will have to manually undeploy an xApp to stop it from running on the RIC.
Demonstration
Managing xApp deployment
View Kubernetes pods:
sudo kubectl get pods -A
View Kubernetes services:
sudo kubectl get svc -A
Build Docker image:
sudo docker build . -t xApp-registry.local:5008/ric-app-ml:1.0.0
Restart xApp:
sudo kubectl rollout restart deployment ricxapp-ric-app-ml -n ricxapp
View xApp logs (replace <podname> with the name of your xApp’s pod):
sudo kubectl logs -n ricxapp <podname>
Enter xApp Kubernetes pod with bash shell (replace <podname> with the name of your xApp’s pod):
sudo kubectl exec --stdin --tty -n ricxapp <podname> -- /bin/sh
Open additional port for E2-like interface
sudo kubectl expose deployment ricxapp-ric-app-ml --port 5000 --target-port 5000 --protocol SCTP -n ricxapp --type=NodePort
Connecting to srsRAN
We will use a modified version of srsRAN with the E2-like interface enabled.
1. To connect our xApp to the E2-like interface, we also need to expose port 5000 of the xApp to our system. This command will enable SCTP connections on our local IP address by creating a NodePort service in Kubernetes called ricxapp-ric-app-ml.
sudo kubectl expose deployment ricxapp-ric-app-ml --port 5000 --target-port 5000 --protocol SCTP -n ricxapp --type=NodePort
2. However, Kubernetes will reroute the xApp’s port to another port that is not 5000, and we need to search for this port by finding the new Kubernetes service that we just created. Run the following command to get a list of all the services:
sudo kubectl get svc -A
Look for ricxapp-ric-app-ml. On the same row in the terminal you should see a set of ports that look like 5000:3XXXX/SCTP. An example is shown below:
ricxapp ricxapp-ric-app-ml NodePort 10.109.106.34 <none> 5000:30255/SCTP 34m
In the above case, we want to use port 30255, as that is the port to access the xApp’s SCTP interface from our local IP address.
3. Let’s store this xApp port in a variable to use later. Replace <xapp port> with the port you found in the previous command.
export XAPP_PORT=<xapp port>
4. Assuming you have already built the E2-like version of srsRAN, go to the directory where srsRAN is built:
cd ~/oaic
cd srsRAN-e2/build
5. Now we can start srsRAN. First, start the EPC in a new terminal if you haven’t already:
sudo srsepc/src/srsepc
6. Before starting the base station, make sure you have the local IP address that you found from the previous steps. Open another terminal for these commands.
hostname -I
export HOST_IP=<ip address>
7. Then, we can start the base station, which will connect to the xApp immediately on startup:
sudo srsenb/src/srsenb --ric.agent.log_level=debug --log.filename=stdout --ric.agent.remote_ipv4_addr=$HOST_IP --ric.agent.remote_port=$XAPP_PORT --ric.agent.local_ipv4_addr=$HOST_IP --ric.agent.local_port=38071 --scheduler.pusch_mcs=28
You should see srsENB connect to the xApp and start sending I/Q data. You will also see E2-like commands being sent.
==== eNodeB started ===
Type <t> to view trace
2023-08-07T16:08:56.272384 [COMN   ] [D] [    0] Setting RTO_INFO options on SCTP socket. Association 0, Initial RTO 3000, Minimum RTO 1000, Maximum RTO 6000
2023-08-07T16:08:56.272387 [COMN   ] [D] [    0] Setting SCTP_INITMSG options on SCTP socket. Max attempts 3, Max init attempts timeout 5000
2023-08-07T16:08:56.272405 [COMN   ] [D] [    0] Successfully bound to address 192.168.122.20:38071
2023-08-07T16:08:56.275261 [COMN   ] [D] [    0] RxSockets: socket fd=17 has been registered.
2023-08-07T16:08:56.275264 [RIC    ] [D] [    0] RIC state -> CONNECTED

2023-08-07T16:08:56.275265 [RIC    ] [I] [    0] connected to RIC on 192.168.122.20
2023-08-07T16:08:56.275265 [RIC    ] [I] [    0] E2-like interface enabled, skipping setup request

2023-08-07T16:08:56.275266 [RIC    ] [D] [    0] RIC state -> ESTABLISHED

2023-08-07T16:08:56.278574 [RIC    ] [I] [    0] received e2-like message: E2-like request at 16:08:56

2023-08-07T16:08:56.278663 [RIC    ] [I] [    0] wrote e2-like message to agent_cmd.bin
2023-08-07T16:08:56.278834 [RIC    ] [I] [    0] Timestamp: 1691424536.2780001

2023-08-07T16:08:56.287438 [RIC    ] [I] [    0] sent I/Q buffer

2023-08-07T16:08:56.359478 [RIC    ] [I] [    0] received e2-like message: m

2023-08-07T16:08:56.359561 [RIC    ] [I] [    0] wrote e2-like message to agent_cmd.bin
2023-08-07T16:08:56.359735 [RIC    ] [I] [    0] Timestamp: 1691424536.3590000

E2-like cmd received, using adaptive MCS
The I/Q data will be empty and E2-like commands won’t be performed until we connect a UE.
8. Before we start the UE, make sure the ue1 network namespace exists:
sudo ip netns add ue1
9. Now, start the UE in a new terminal window and it should connect, initiating I/Q data transfer.
sudo srsue/src/srsue --gw.netns=ue1
Waiting PHY to initialize ... done!
Attaching UE...
Current sample rate is 1.92 MHz with a base rate of 23.04 MHz (x12 decimation)
Current sample rate is 1.92 MHz with a base rate of 23.04 MHz (x12 decimation)
.
Found Cell:  Mode=FDD, PCI=1, PRB=50, Ports=1, CP=Normal, CFO=-0.2 KHz
Current sample rate is 11.52 MHz with a base rate of 23.04 MHz (x2 decimation)
Current sample rate is 11.52 MHz with a base rate of 23.04 MHz (x2 decimation)
Found PLMN:  Id=00101, TAC=7
Random Access Transmission: seq=18, tti=341, ra-rnti=0x2
RRC Connected
Random Access Complete.     c-rnti=0x46, ta=0
Network attach successful. IP: 172.16.0.3
Software Radio Systems RAN (srsRAN) 7/8/2023 16:8:59 TZ:0
10. Now, we can initiate uplink data transfer. Start an iperf3 server from the nodeB side in a new terminal:
iperf3 -s -i 1
11. Then, we can connect to this server from the UE side.
.. Replace <UE IP> with the IP address seen in the srsue window when connected. (In the above case, it is 172.16.0.3)
sudo ip netns exec ue1 iperf3 -c 172.16.0.1 -b 10M -i 1 -t 0
Traffic should be visible on both sides:
-----------------------------------------------------------
Server listening on 5201
-----------------------------------------------------------
Accepted connection from 172.16.0.1, port 55794
[  5] local 172.16.0.3 port 5201 connected to 172.16.0.1 port 55804
[ ID] Interval           Transfer     Bitrate
[  5]   0.00-1.00   sec  1.20 MBytes  10.1 Mbits/sec
[  5]   1.00-2.00   sec  1.15 MBytes  9.61 Mbits/sec
[  5]   2.00-3.00   sec  1.23 MBytes  10.3 Mbits/sec
[  5]   3.00-4.00   sec  1.17 MBytes  9.85 Mbits/sec
[  5]   4.00-5.00   sec  1.20 MBytes  10.1 Mbits/sec
[  5]   5.00-6.00   sec  1.20 MBytes  10.1 Mbits/sec
12. Now, we should go back to srsUE to see the MCS change. input “t” into the terminal to open up a trace on the UE side. It should look like this:
Software Radio Systems RAN (srsRAN) 7/8/2023 16:8:59 TZ:0
t
Enter t to stop trace.
---------Signal-----------|-----------------DL-----------------|-----------UL-----------
cc  pci  rsrp   pl   cfo | mcs  snr  iter  brate  bler  ta_us | mcs   buff  brate  bler
0    1   -11   11 -800n |  27  137   1.0    12M    0%    0.0 |  28    290   295k    0%
0    1   -11   11 -728n |  27  137   1.0    11M    0%    0.0 |  28    0.0   300k    0%
0    1   -11   11 -971n |  27  137   1.0    12M    0%    0.0 |  20    0.0   298k    0%
0    1   -11   11 -579n |  27  137   1.0    11M    0%    0.0 |  21    279   288k    0%
Notice that in the previous srsenb command, we manually specify a fixed MCS of 28. When the E2-like interface is connected and the xApp sends a command to start using adaptive MCS, the trace will show the MCS changing to around 20-21, according to the signal quality.
If you view the logs of the xApp, you should see the I/Q data being received and the predictions being made by the xApp. These predictions are not based on the I/Q data, but the xApp receives the I/Q data and creates valid spectrograms, so you can modify the code to handle the spectrograms however you would like.
oaic-03-op@oaic-03:~/oaic/ric-app-ml$ sudo kubectl logs -n ricxapp ricxapp-ric-app-ml-7b87c4d788-9m9cx | head -c 1000
[INFO] E2-like enabled, connecting using SCTP on 10.244.0.50
[INFO] Server started
[INFO] Connected by ('10.244.0.1', 38071)
[INFO] Sent E2-like request
[INFO] Receiving I/Q data...
[INFO] Received buffer size 622592
[INFO] Finished receiving message, processing
[INFO] Interference signal detected, sending control message to enable adaptive MCS
[INFO] Sent E2-like request
[INFO] Receiving I/Q data...
Undeployment
Undeploy xApp using App Manager:
export APPMGR_HTTP=`sudo kubectl get svc -n ricplt --field-selector metadata.name=service-ricplt-appmgr-http -o jsonpath='{.items[0].spec.clusterIP}'`
curl -L -X DELETE http://${APPMGR_HTTP}:8080/ric/v1/xapps/ric-app-ml
Remove xApp’s chart from xApp onboarder:
export ONBOARDER_HTTP=`sudo kubectl get svc -n ricplt --field-selector metadata.name=service-ricplt-xapp-onboarder-http -o jsonpath='{.items[0].spec.clusterIP}'`
curl -L -X DELETE "http://${ONBOARDER_HTTP}:8080/api/charts/<xApp_name>/<xApp_tag>"
Undeploy/redeploy the RIC components in the Kubernetes cluster:
cd ~/oaic/RIC-Deployment/bin/
sudo ./undeploy-ric-platform

sudo ./deploy-ric-platform -f ../RECIPE_EXAMPLE/PLATFORM/example_recipe_oran_e_release_modified_e2.yaml
Delete additional port for E2-like interface:
sudo kubectl delete service ricxapp-ric-app-ml -n ricxapp
Troubleshooting
srsRAN commands
Force exit srsenb:
sudo pkill -5 srsenb
Issues
xApp stuck on “Receiving I/Q data…” or srsenb won’t connect to xApp
This usually happens when srsenb has been closed and you try to restart and reconnect to the xApp. Restart the xApp with sudo kubectl rollout restart deployment ricxapp-ric-app-ml -n ricxapp, and wait for the previous xApp pod to be deleted from the list. Afterwards, start the eNB, then start the UE.
If the xApp randomly gets stuck on “Receiving I/Q data…” while connected to the nodeB, it is likely that it is not receiving enough data from the RAN. With the E2-like version of srsRAN supplied in the e2like-doc branch, you may need to send more than one E2-like request to ensure that the nodeB has received the message and will respond.
xApp crashes after a while/pods eject themselves
Kubernetes will automatically shut off or restart pods when the system is low on resources. If you are on a system with low RAM, you may find that the xApp restarts with error code 137. If you are on a system with low hard drive space, you may find that the pods in the RIC will be repeatedly ejected. The RIC is also prone to CrashLoopBackOff and Error issues when the logs get too large, which also consumes hard drive space.
To ensure xApp stability, first make sure that your computer has enough remaining resources to support the RIC. Beyond this, another solution is to reduce the amount of logs your xApp produces, as when the xApp produces logs for a long time, it can prevent the RIC from functioning and require redeployment.
Kong is stuck in CrashLoopBackOff!
If Kong is not working in your near-RT RIC, you will not be able to deploy the xApp with the above commands. However, we can directly access the xApp Onboarder and App Manager’s IP addresses and bypass the Kong proxy.
For the Onboard and deploy the xApp section, use the following commands instead:
Get the IP addresses for the necessary pods:
export APPMGR_HTTP=`sudo kubectl get svc -n ricplt --field-selector metadata.name=service-ricplt-appmgr-http -o jsonpath='{.items[0].spec.clusterIP}'`
export ONBOARDER_HTTP=`sudo kubectl get svc -n ricplt --field-selector metadata.name=service-ricplt-xapp-onboarder-http -o jsonpath='{.items[0].spec.clusterIP}'`
Submit our onboard URL file to the xApp onboarder:
curl -L -X POST "http://$ONBOARDER_HTTP:8888/api/v1/onboard/download" --header 'Content-Type: application/json' --data-binary "@ml-onboard.url"
Deploy the xApp:
curl -L -X POST "http://$APPMGR_HTTP:8080/ric/v1/xapps" --header 'Content-Type: application/json' --data-raw '{"xappName": "ric-app-ml"}'