Day 3 - OAIC-T
About OAIC-T
OAIC-T is an open-source AI cellular testing platform which supports automated, distributed, and AI-enhanced testing of xApps in O-RAN. The OAIC-T framework consists of three major components: i). Test Input, which includes both test configuration and test script files, ii). the Server, which sets up the testing environment as described in test configuration files and orchestrates the test execution as defined in test scripts, and iii) the Actor(s), which executes test actions as instructed by the server.
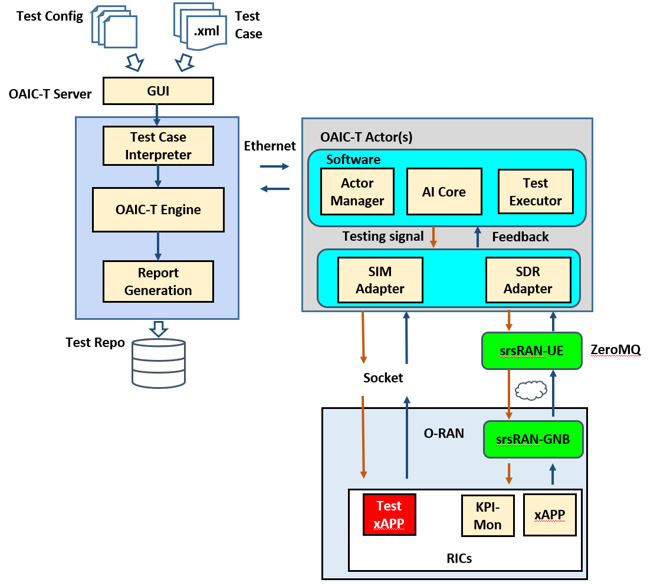
The server manages a number of remote testing actors, including maintaining the socket connection to each actor and monitoring its resource usage (e.g., CPU, memory, disk, and SDR hardware) and test status.
One actor consists of the actor manager, AI core, and test executor, as well as two adapters to interface with the unit under test (i.e., a cellular radio network controller). Each actor can interact with xApps/rApps under test through either the SIM Adapter or the SDR Adapter. The SIM Adapter acts as a testing xApp/rApp which can be deployed in a non-RT, near-RT, or RT RIC to send testing data and receive response to/from the RAN through socket communications. The SDR Adapter acts as a user equipment (UE) which leverages SDR-based software suite (e.g., srsRAN) to send radio testing signals to the RAN through antennas.
First please install VNC Viewer on your OS Config VNC port on your Google Cloud and set the port 5901 and tag
sudo -i
Go to the root home
git clone https://github.com/openaicellular/main-file-repo.git
cd main-file-repo
chmod +x setup-vnc.sh
sudo ./setup-vnc.sh
Enter a password for your vnc server
gnome-terminal
chmod +x ricinstallation.sh
sudo ./ricinstallation.sh
sudo kubectl get pods -A
cp -f -r srsrandeploy.sh oaic
cd oaic
chmod +x srsrandeploy.sh
./srsrandeploy.sh
cd..
Run the Network before Deploying the xApp
srsEPC:
Before deploying xApp make sure your network is up, check to run EPC, en-gNB, near-RT RIC, and UE:
sudo ip netns add ue1
sudo ip netns list
Now, in a new command window on Machine 1 run srsRAN EPC:
sudo srsepc
In a new command window on Machine 1 run srsRAN en-gNB.But before we start the en-gNB, we need to get the current machine’s IP address and the IP address of the E2 Termination service at the near-RT RIC.
export E2NODE_IP=`hostname -I | cut -f1 -d' '`
export E2NODE_PORT=5006
export E2TERM_IP=`sudo kubectl get svc -n ricplt --field-selector metadata.name=service-ricplt-e2term-sctp-alpha -o jsonpath='{.items[0].spec.clusterIP}'`
Run srsENB
sudo srsenb --enb.n_prb=50 --enb.name=enb1 --enb.enb_id=0x19B \
--rf.device_name=zmq --
rf.device_args="fail_on_disconnect=true,tx_port0=tcp://*:2000,rx_port0=tcp://localhost
:2001,tx_port1=tcp://*:2100,rx_port1=tcp://localhost:2101,id=enb,base_srate=23.04e6
" \
--ric.agent.remote_ipv4_addr=${E2TERM_IP} --log.all_level=warn --
ric.agent.log_level=debug --log.filename=stdout --
ric.agent.local_ipv4_addr=${E2NODE_IP} --ric.agent.local_port=${E2NODE_PORT}
Once the en-gNB is up and successfully connected to the near-RT RIC, you will see E2 Setup and E2 Response messages on the console. You will also see RIC Connection Initialized and RIC state established messages.
In the new terminal:
sudo srsue --gw.netns=ue1
PING:
This is the simplest way to test the network. This will test whether or not the UE and core can successfully communicate. The ping command should be executed on a new terminal from the UE’s network space
sudo ip netns exec ue1 ping 172.16.0.1
cp -f -r kpimondeploy.sh oaic
cd oaic
chmod +x kpimondeploy.sh
./kpimondeploy.sh
Verifying xApp Deployment
There should be a ricxapp-scp-kpimon pod in ricxapp namespace
sudo kubectl get pods -A
We can check the xApp logs using
sudo kubectl logs -f -n ricxapp -l app=ricxapp-scp-kpimon
Note
Since the E2 Node is already up and running and the Key Performance Metrics
(KPM) RAN function is enabled by default, the xApp will be able to subscribe to the
E2 Node and start getting INDICATION messages. The decoded message containing
information about the metrics is stored in the kpimon.log within the pod. This can
be viewed by, sudo kubectl exec -it -n ricxapp `sudo kubectl get pod -n ricxapp -l app=ricxapp-scp-kpimon -o jsonpath='{.items[0].metadata.name}'` -- tail -F /opt/kpimon.log
cp -f -r oaictdeploy.sh oaic
chmod +x oaictdeploy.sh
sudo ./ oaictdeploy.sh
sudo kubectl logs -f -n ricxapp -l app=ricxapp-SC3
Copy IP from log to the order xml Go to the vnc server Step 1. Run the OAIC-T Server:
cd server/src
python3 server_main.py
Step 2. Run the OAIC-T Actor(s):
cd actor/src
sudo python3 actor_main.py