Running the Nexran Xapp
Overview
The xapp is deployed in the near real time ric (3rd party APP). This deployed xapp then performs its functionality which in this case is RAN slicing.
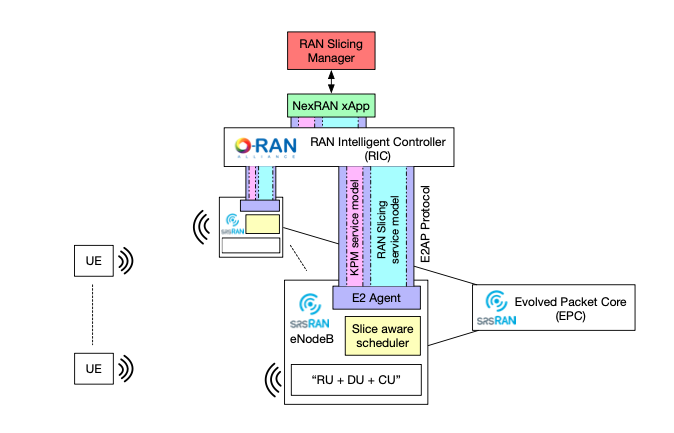
Powder’s Nexran xapp implements ran slicing by sending instructions to RAN nodes, that performs custom resource allocation and we bind UE’s to those slices of allocated resources.
The xapp has a southbound interface to the RIC where it can send commands down to the nodes and a northbound interface where high level commands can be issued by the user.
Setup
First we need to clone down the srslte modified with e2 specifically for NEXRAN
cd oaic
git clone https://github.com/openaicellular/srslte-e2
cd srslte-e2
rm -rf build
mkdir build
export SRS=`realpath .`
cd build
cmake ../ -DCMAKE_BUILD_TYPE=RelWithDebInfo \
    -DRIC_GENERATED_E2AP_BINDING_DIR=${SRS}/e2_bindings/E2AP-v01.01 \
    -DRIC_GENERATED_E2SM_KPM_BINDING_DIR=${SRS}/e2_bindings/E2SM-KPM \
    -DRIC_GENERATED_E2SM_GNB_NRT_BINDING_DIR=${SRS}/e2_bindings/E2SM-GNB-NRT
make -j`nproc`
make test
sudo make install
sudo ldconfig
sudo srslte_install_configs.sh user --force
cd ../../
We can now clone the repositories we will need to run build the xapp and onboard it as well as run multiple ues
Warning
Make sure you open a new terminal before you run these following commands. This prevents you from downloading anything under the root directory
Under the oaic directory, run the following commands
git clone https://github.com/openaicellular/nexran.git
Now we are going to build the xapp from the dockerfile
cd ~/oaic/nexran

sudo docker build . -t xApp-registry.local:5008/nexran:0.1.0
Paste the following in the nexran-onboard.url file. Substitue the <machine_ip_addr> with the IP address of your machine. You can find this out through ifconfig.
{"config-file.json_url":"http://<machine_ip_addr>:5010/config-file.json"}
Running the xapp
Terminal 1: Start the Core Network/Ues
sudo ip netns add ue1
sudo srsepc
Terminal 2: Set up Environment Variables and Base Station
export E2NODE_IP=`hostname  -I | cut -f1 -d' '`
export E2NODE_PORT=5006
export E2TERM_IP=`sudo kubectl get svc -n ricplt --field-selector metadata.name=service-ricplt-e2term-sctp-alpha -o jsonpath='{.items[0].spec.clusterIP}'`
sudo srsenb \
--enb.n_prb=50 --enb.name=enb1 --enb.enb_id=0x19B --rf.device_name=zmq \
--rf.device_args="fail_on_disconnect=true,tx_port=tcp://*:2000,rx_port=tcp://localhost:2001,id=enb,base_srate=23.04e6" \
--ric.agent.remote_ipv4_addr=${E2TERM_IP} --log.all_level=warn --ric.agent.log_level=debug --log.filename=stdout \
--ric.agent.local_ipv4_addr=${E2NODE_IP} --ric.agent.local_port=${E2NODE_PORT} \
--slicer.enable=1 --slicer.workshare=0
Terminal 3: Set up the first UE
sudo srsue \
  --rf.device_name=zmq --rf.device_args="tx_port=tcp://*:2001,rx_port=tcp://localhost:2000,id=ue,base_srate=23.04e6" \
--usim.algo=xor --usim.imsi=001010123456789 --usim.k=00112233445566778899aabbccddeeff --usim.imei=353490069873310 \
--log.all_level=warn --log.filename=stdout --gw.netns=ue1
Terminal 4: Iperf test on server side
sudo ip netns exec ue1 iperf -s -p 5010 -i 4 -t 36000
Terminal 5: Iperf test on client side
iperf -c 172.16.0.2 -p 5010 -i 4 -t 36000
Terminal 6
cd nexran
export KONG_PROXY=`sudo kubectl get svc -n ricplt -l app.kubernetes.io/name=kong -o jsonpath='{.items[0].spec.clusterIP}'`
export E2MGR_HTTP=`sudo kubectl get svc -n ricplt --field-selector metadata.name=service-ricplt-e2mgr-http -o jsonpath='{.items[0].spec.clusterIP}'`
export APPMGR_HTTP=`sudo kubectl get svc -n ricplt --field-selector metadata.name=service-ricplt-appmgr-http -o jsonpath='{.items[0].spec.clusterIP}'`
export E2TERM_SCTP=`sudo kubectl get svc -n ricplt --field-selector metadata.name=service-ricplt-e2term-sctp-alpha -o jsonpath='{.items[0].spec.clusterIP}'`
export ONBOARDER_HTTP=`sudo kubectl get svc -n ricplt --field-selector metadata.name=service-ricplt-xapp-onboarder-http -o jsonpath='{.items[0].spec.clusterIP}'`
export RTMGR_HTTP=`sudo kubectl get svc -n ricplt --field-selector metadata.name=service-ricplt-rtmgr-http -o jsonpath='{.items[0].spec.clusterIP}'`
Deploying the xApp
curl -L -X POST "http://$KONG_PROXY:32080/onboard/api/v1/onboard/download" --header 'Content-Type: application/json' --data-binary "@nexran-onboard.url"
curl -L -X GET "http://$KONG_PROXY:32080/onboard/api/v1/charts"
curl -L -X POST "http://$KONG_PROXY:32080/appmgr/ric/v1/xapps" --header 'Content-Type: application/json' --data-raw '{"xappName": "nexran"}'
If you already have NEXRAN xApp deployed on your system, you need to restart the pod using the command below before running the rest of the commands
sudo kubectl -n ricxapp rollout restart deployment ricxapp-nexran
Add another terminal to print the NEXRAN logs
sudo kubectl logs -f -n ricxapp -l app=ricxapp-nexran
Warning
Before running the rest of the commands, detach one of the terminal with the iperf test running to observe the downlink traffic Also, detach the terminal with the NEXRAN logs
export NEXRAN_XAPP=`kubectl get svc -n ricxapp --field-selector metadata.name=service-ricxapp-nexran-rmr -o jsonpath='{.items[0].spec.clusterIP}'`

echo NEXRAN_XAPP=$NEXRAN_XAPP echo ; echo
Now run the test script with the following commands
chmod +x zmqoneue.sh
./zmqoneue.sh
Observe a slight change in the throughput in the detached terminal
Now run these commands to invert the fast and slow slices
curl -i -X PUT -H "Content-type: application/json" -d '{"allocation_policy":{"type":"proportional","share":1024}}' http://${NEXRAN_XAPP}:8000/v1/slices/slow ; echo ; echo ;
curl -i -X PUT -H "Content-type: application/json" -d '{"allocation_policy":{"type":"proportional","share":256}}' http://${NEXRAN_XAPP}:8000/v1/slices/fast ; echo ; echo
Observe large change in the throughput in the detached terminal